
Tile Spacers - What Size Should I Use? How Many Will I Need?
Why use tile spacers?
Tile spacers can aid in giving your job a professional finish (as well as providing a variety of style/design options for your customer) and come in a range of shapes and sizes. Tile spacers allow you to achieve a consistent pattern when fixing wall/floor tiles and help to ensure that all tiles are laid equidistant from each other (providing a symmetrical finish - as you or your customer would expect) in order for the grout to then be applied.
What size tile spacers should I use?
Selecting the size of spacer required for a job is often down to personal preference (however there are British Standards to consider). As such it is recommended that you get the customers opinion on what they would prefer (as the spacers will dictate the width of the grout lines, which are a strong feature of the overall floor/wall design). As long as the job is completed in a way that will be long lasting (i.e. allowing for the movement of tiles for stress relief - 2mm is usually sufficient for walls and 3mm for floors) then the aesthetic side can usually be left to the customer.Taking British Standards into consideration (as well as common practice) it is recommended that wall spacers are 2-3mm (with 2mm covering the majority of requirements) and floor spacers 3-5mm.

Popular tile spacer sizes - not to scale
How to use tile spacers: pre-testing
Use spacers to do a trial run for your design (this will help finalise your design and ensure that you have a clearer picture of what the outcome will look like). It is recommended that you lay this trial run in the centre of the room and then visualise the complete design from different points in the room. It would also be wise to take into account any unusual areas you will need to tile (such as around sinks or showers) and see how they will affect the overall design.
>> Buy Rubi tile spacers - for a professional finish every time! <<
How to use tile spacers: starting work
- Locate the centre of the room (both length-wise and width-wise) and use a chalk line or laser level to create a gridline. This will ensure your first tile and spacers are aligned in a straight line and in the centre.
- Lay your first tile in-line with your reference point (either the chalk line or laser level).
- After your first tile is laid, put a spacer on each corner of the tile (ensuring they are flush).
Note: When using floor tiles it is also recommended to use two "square" spacers per side (in addition to the plus spacers on each corner). This provides additional accuracy along the length of the tile. You can turn a "plus" shaped spacer on its side to create a "square" spacer. - Place the next tile against the spacers of your first tile. Then place additional spacers against the remaining corners of the new tile.
- Repeat this process, expanding the wall/floor outwards using the spacers at the edges of each tile to keep a consistent distance between tiles.
- When you come to an area where you do not need a four sided "plus sign" spacer use a T-shaped spacer. Place the "T-shaped spacer" with the flat end against the wall or other surface. Alternatively, you can break one "leg" off a normal "plus" spacer to make a "T" spacer.
- Remove the spacers (using either your fingers or needle/snipe nosed pliers) after the tiles have been placed but before the adhesive fully seals. This time varies however it is usually 20-30 minutes (check the manufacturers information on the product packaging for accurate drying times).
- You can now begin the grouting process, which closes the space between the tiles, bonding them together tightly and providing a waterproof seal.
How many tile spacers do I need?
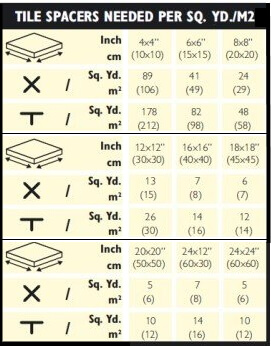
For use as an approximate guide only
Tile spacing hints & tips
- For a smaller room use smaller spacers, this will allow you to utilise more tiles in the area, giving the impression of a larger space (again this is down to preference and should be discussed with the customer beforehand).
- Not all rooms are completely square and even then, not all walls are always equidistant at any two points (these can differ between mm to inches in some cases) - if the discrepancy could be considered an issue, it may be better to use larger spacing to attempt to minimise its impact on the overall job.
- Planning is important - don't just go for the first option, sample a few different placements and see which works best for the room. Some size rooms may look better with wider spacing where as others may suit narrow spacing (there really is no right or wrong answer and as always discuss this with your customer beforehand).
- Spacing your tiles an extra mm apart can often save the majority of small cuts (across the total length of a wall/floor this can make a big difference!).
- It is not recommended to go below 2mm for wall tiles and 3mm for floor tiles due to the requirement of stress relief. All walls and floors are subject to movement (due to climate condition changes etc) and without an element of stress relief tiles will either crack or buckle.
- Using a chalk line or laser level when laying tiles and spacers can help maintain a straight line across a floor for even greater precision.
© 2015 Buy Brand Tools
>> Buy Rubi tiling tools - Huge range in stock at discount prices! <<


Shop By Category

Free UK Delivery
When you spend over £100 (+VAT)*

Economy = £4.95 (+VAT)
(small & non-bulky items only)
Next Work Day = £6.95 (+VAT)
Orders £100 and over = FREE!
Long Length = £14.95 (+VAT)
(next day, for any order value)
Full UK Delivery Info
European Delivery Info
Worldwide Delivery Info
* Free over £100 excludes long length items (tile trim & 1.5m+ levels)
Service You Can Trust
Scott, and his small team of friendly customer service advisors work extremely hard to ensure that your order is delivered when you expect it. Scott is available to answer any enquiries you may have.

Other Information
Secure Online Payments